Homemade Delight: Making Your Own Rocks for Kids
As the leaves turn golden and the air grows crisp, there’s something so comforting about gathering around the kitchen table with the little ones. My most cherished moments often revolve around the simple joys of creating together. One particular afternoon comes to mind, where my children, full of laughter and boundless imagination, decided they wanted to make something unique. That’s when we landed upon the magical world of edible rock treats.
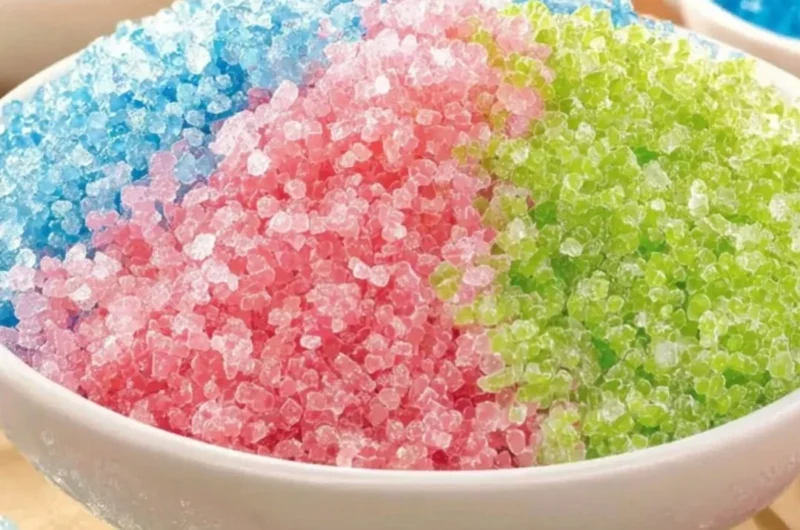
We crafted colorful, delicious rocks made from clay and tasty ingredients, transforming our kitchen into a wonderland of creativity. This “Making Your Own Rocks for Kids” recipe became a favorite, not just because it satiated our sweet tooth, but because it brought us together in laughter and love. Trust me, this is a cozy family activity you’ll want to remember and pin for later!
Why You’ll Love This Recipe
- Easy Peasy: With just a few simple steps, you’ll find that making these edible rocks is a breeze, making it perfect for a quick family fun day!
- No Baking Required: Yes, you heard that right! This no-bake recipe allows for creativity without the heat of the oven, keeping your kitchen cool and cozy.
- Customizable: These sweet rocks allow for endless creativity. Add your personal touch with various flavors and colors that fit your family’s tastes!
- Family-Friendly Fun: It’s not just a treat; it’s a delightful hands-on project that everyone can partake in, perfect for family bonding.
- Perfect for Parties: Whether it’s a birthday or a simple get-together, these vibrant rock treats are sure to be a crowd-pleaser!
- Nostalgic and Playful: Remember making mud pies as a child? This brings that joy back, but with a sweet, edible twist!
What You’ll Need
Gather these simple ingredients to embark on this delightful journey:
- 2 cups of edible clay (store-bought or homemade)
- Food coloring (your choice of colors)
- Edible glitter (optional for that extra sparkle)
- Candy or chocolate chips (for texture and flavors)
- Sprinkles (for a fun touch)
- A rolling pin (for that perfect shape)
- Wax paper (to prevent sticking)
How to Make Making Your Own Rocks for Kids | How to Make Rocks from Clay, Tasty Treats to Make at Home
Let’s make it together! Follow these simple steps to create your own crunchy, colorful rocks.
Prep Your Space: Start by setting up your kitchen with wax paper on the counter to make cleanup a breeze and to provide a non-stick surface for rolling.
Mix the Clay: Take your edible clay and place it in a large bowl. If you’re using plain white clay, this is the moment to add a few drops of food coloring and mix until you achieve a vibrant color of your choice!
Get Creative: Now it’s time to knead the clay a little to ensure it’s soft and pliable. You may want to divide it into portions if you’re using multiple colors.
Roll and Shape: Using your rolling pin, flatten the clay into a layer about 1/4 inch thick. With your hands or cookie cutters, shape them into rock-like pieces. Don’t worry about perfection — rocks come in all shapes and sizes!
Add a Crunch: Before they dry completely, sprinkle in some candy chips or sprinkles to imitate natural rock texture. Fold them in gently, allowing them to stay visible.
Let them Set: Place the shaped rocks on the wax paper and allow them to air dry for about 30 minutes. If you have colored rocks, let them dry thoroughly, as they can become sticky otherwise.
Enjoy or Store: Once they’re dry, these edible rocks are ready for devouring, or you can store them in an airtight container for later enjoyment!
Fun Ways to Customize It
These sweet edible rocks are like a blank canvas waiting for your creative flair. Here are a few delightful variations you can try:
- Zesty Citrus Flavor: Add a hint of lemon or orange zest to the edible clay for a refreshing twist!
- Creamy Chocolate Delight: Mix in cocoa powder for a richer flavor profile and even dive into dark or milk chocolate chips!
- Nutty Twist: Fold in finely crushed nuts for an unexpectedly crunchy element that all ages will love.
- Festive Themes: During the holidays, use red and green food coloring and sprinkle with festive shapes for a seasonal surprise!
Chef Emma’s Helpful Tips
- Make-Ahead: These edible rocks can be prepared ahead of time. Store them in an airtight container and take them out for special occasions or just-a-because moments!
- Material Swaps: If you don’t have edible clay, you can use homemade fondant or even dough; just ensure they’re safe for kids to handle.
- Keep it Clean: Keep a bowl of warm, soapy water nearby for everyone to wash their hands after this fun activity!
- Slicing Tricks: For a more polished “rock” appearance, press a carving knife gently into the sides of the formed clay pieces to add texture before letting them dry.
What’s Inside – Nutrition Breakdown
- Serving Size: 1 large rock
- Calories: 120
- Carbohydrates: 30g
- Sugar: 15g
- Fat: 2g
- Protein: 1g
- Sodium: 10mg
Frequently Asked Questions
Can I make this ahead?
Absolutely! You can prepare these edible rocks ahead of time and store them in an airtight container for several days.
Can I use different ingredients?
Yes! Feel free to swap out ingredients based on preferences, using different colorings or flavorings of edible clay.
How do I store leftovers?
Store any leftover rocks in an airtight container at room temperature.
How long does it last?
When stored properly, these treats can last for a week, but I bet they won’t last that long!
A Cozy Closing Note
Creating edible rocks is more than just a recipe; it’s an opportunity to bond, express creativity, and enjoy sweet treats that remind us of childhood games. I hope this recipe finds a special place in your family’s heart and home. Save this "Making Your Own Rocks for Kids | How to Make Rocks from Clay, Tasty Treats to Make at Home" to your cozy activity board so it’s ready for your next family fun day! Happy creating!
Making Your Own Rocks for Kids
- Total Time: 45 minutes
- Yield: 10 servings 1x
- Diet: Vegetarian
Description
A fun, no-bake recipe for making colorful edible rock treats with your kids, perfect for creative bonding.
Ingredients
- 2 cups of edible clay (store-bought or homemade)
- Food coloring (your choice of colors)
- Edible glitter (optional for that extra sparkle)
- Candy or chocolate chips (for texture and flavors)
- Sprinkles (for a fun touch)
- A rolling pin (for that perfect shape)
- Wax paper (to prevent sticking)
Instructions
- Prep your space: Start by setting up your kitchen with wax paper on the counter for a non-stick surface.
- Mix the clay: Place the edible clay in a large bowl and add food coloring if desired.
- Get creative: Knead the clay until soft and pliable, dividing it if using multiple colors.
- Roll and shape: Flatten the clay into a layer about 1/4 inch thick and shape into rock-like pieces.
- Add a crunch: Sprinkle in candy chips or sprinkles before they dry completely.
- Let them set: Allow the shaped rocks to air dry on wax paper for about 30 minutes.
- Enjoy or store: Once dry, these edible rocks are ready to eat or can be stored in an airtight container for later!
Notes
These sweet edible rocks are customizable. Try adding flavorings like lemon zest or cocoa powder for variations.
- Prep Time: 15 minutes
- Cook Time: 30 minutes
- Category: Dessert
- Method: No-Bake
- Cuisine: American
Nutrition
- Serving Size: 1 large rock
- Calories: 120
- Sugar: 15g
- Sodium: 10mg
- Fat: 2g
- Saturated Fat: 0g
- Unsaturated Fat: 1g
- Trans Fat: 0g
- Carbohydrates: 30g
- Fiber: 0g
- Protein: 1g
- Cholesterol: 0mg